


Hi folks, it's been a while!
I've decided to update my old blog post where I was explaining how to customize the Admin UI for old Medusa versions, but now let's see how to customize the new Medusa Admin UI, that works with injected npm packages (plugins)
How It Works Under the Hood
First of all, how does it work under the hood? These new versions of Medusa have introduced a new way of building the backoffice of your e-commerce app. At the moment, the new Admin UI is a package called @medusajs/admin, or at least that's what I thought. Indeed, this package is here to build and inject a plugin in your backend with some more options. The real package behind the UI is the @medusajs/admin-ui, which contains all the React app inside.
Customizing the Admin UI
So maybe you guessed it, but if you want to customize the admin to suit your needs, you'll need to fork both packages:
One that will contain the real styles (
@medusajs/admin-ui) and your fresh changes.The other one that will be used as a plugin in your backend (
@medusajs/admin) that will build your frontend.
By forking these packages and making the necessary changes, you can customize the Medusa Admin UI to match your specific requirements and preferences.
Forking the Packages
First, I'm currently using version 1.20.4 of Medusa, and I'll get the packages from the GitHub repo with this specific version (Tags > v1.20.4).I'm just going to download the entire Medusa repo and only drop the following folders onto my computer:
/packages/admin/packages/admin-ui
Then, we will install the dependencies of both packages and update the package.json to have a unique package name for uploading reasons to NPM. In my case, I'll call them:
@my-custom/admin@my-custom/admin-ui
This will be useful for later installs on your backend.
Note:*
You can use another registry than NPM, but here I'll only cover the NPM public packages.*
Installing Dependencies
To install the dependencies you'll need to use yarn, navigate to the admin-uidirectory only and run the following command:
yarn
We are only installing dependencies for the admin-ui package for now, since the admin is going to have dependencies updated.
Updating Package Names
Open the package.json file in each package directory and update the name field to your desired package name. For example:
{
  "name": "@my-custom/admin-ui",
  "license": "MIT",
  "version": "0.0.1",
  "exports": {
    ".": {
      "import": "./dist/index.mjs",
      "require": "./dist/index.js"
    },
    "./ui": "./ui",
    "./package.json": "./package.json"
  },
  "main": "dist/index.js",
  "types": "dist/index.d.ts",
  "files": [
    "dist",
    "ui"
  ],
  // ...
}
Update the name field to match your desired package name, such as @my-custom/admin and @my-custom/admin-ui. By forking the packages and making the necessary changes, you can customize the Medusa Admin UI to match your specific requirements and preferences.
Starting the Development Server for the Admin UI
The Admin UI package contains a dev command, which will serve the frontend app on port 7001 and allows you to see changes in real-time. You can implement all the changes by navigating inside the /ui/ folder. To start the development server, run the following command in the @my-custom/admin-ui package directory:
yarn dev
This will start the development server and should open the Admin UI in your default browser.
Building and Publishing the Admin UI Package
Once you are done with your changes, you can publish the package by building it using the build command and running npm publish.
yarn build
npm publish
This will build the package and publish it to the NPM registry.
Updating the Admin Package
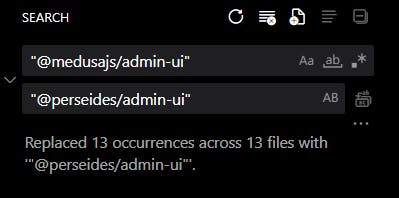
Now, let's focus on the @my-custom/admin package that will be installed/injected into your backend. We need to replace all occurrences of the @medusajs/admin-ui package with our new package name. Open thepackage.json file in the@my-custom/adminpackage directory and update the @medusajs/admin-ui dependency to use your forked package:
{
  "dependencies": {
    "@medusajs/medusa": "^1.20.4", // Remove it by yours
    "@my-custom/admin-ui": "0.0.1" // Your package here
  }
}
Update the version number to match your forked package version.
Installing Dependencies
Now that we have replaced any mentions of the Medusa package, we can install the dependencies for this package.
yarn
Once the dependencies are installed, you can build and publish the package again.
Patching the Medusa Core
As a final step, we need to make specific changes to the Medusa Core. Medusa Core will try to look specifically for the @medusajs/admin package when you run the medusa develop command. This is for auto-rebuilding (and other features) when you change your code, but the issue here is that the value is hardcoded and not meant to be changed. We need to update it to ensure that our package will be used instead of the official one. To achieve this, we'll use Patching the Medusa Core
As a final step, we need to make specific changes to the Medusa Core. Medusa Core will try to look specifically for the@medusajs/admin package when you run themedusa developcommand. This is for auto-rebuilding when you change your code, but the issue here is that the value is hardcoded and not meant to be changed. We need to update it to ensure that our package will be used instead of the official one.To achieve this, we'll use patch-package, a popular npm package (with over 2 million downloads per week) that allows you to create patches for any node modules. This is what we'll do to force Medusa Core to use our custom Admin plugin.
Installing and Using patch-package
First, you need to installpatch-packageinto your backend repository:
yarn add -D patch-package
Modifying the Patch File
Then, create a patch file for the resolve-admin-cli.js file located at : node_modules/@medusajs/medusa/dist/commands/utils/resolve-admin-cli.js
var cli = path_1.default.resolve(
require.resolve("@medusa/admin"), // Change the plugin name here with your custom one
"../../",
"bin",
"medusa-admin.js");
Change the value from "@medusajs/admin" to "@my-custom/admin" to use your forked package.
Once you have saved the updated JavaScript file, you can now run the following command that will create a patch :
yarn patch-package @medusajs/medusa
This command will create a patches/@medusajs+medusa+1.20.4.patch file in your project's root directory.
Applying the Patch
Finally, add the following script to yourpackage.jsonfile:
{
  "scripts": {
    "postinstall": "patch-package"
  }
}
This script will automatically apply the patch after running yarninstall. Now, whenever you run yarn install or medusa develop, the patch will be applied, and Medusa Core will use your forked @my-custom/admin package instead of the official one.
Once is done, you can now run your dev server, and your changes should be visible!
